The common impulse to aggressively sand an old oak parquet floor to make it look ‘new’ is the surest way to destroy its soul. This guide rejects that approach, teaching a preservation-focused restoration method instead. You will learn to think like a craftsman, making choices that honor your floor’s history, preserve its material integrity, and enhance the beautiful patina that only time can create. It’s not about erasing the past, but making it part of the future.
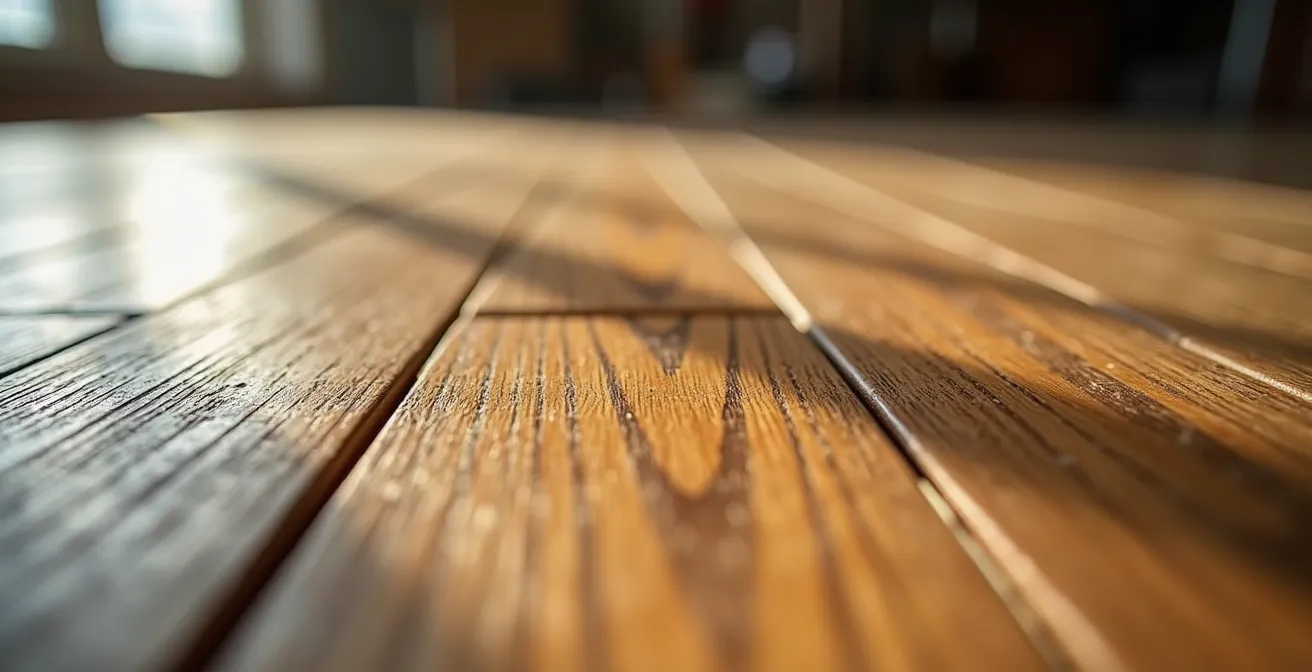
The solid oak parquet in a 1920s home is more than just a floor; it’s a foundational element of the house’s character. Each block tells a story through its grain, color, and subtle imperfections. When faced with signs of wear—scuffs, dullness, or a deep gouge—the modern instinct is often to seek a flawless, factory-new finish. The internet is filled with advice that pushes for aggressive sanding, powerful strippers, and thick, plastic-like coatings. This approach treats your floor like a disposable surface, not the historical asset it truly is.
But what if the goal wasn’t to erase a century of life, but to celebrate it? The true art of restoration lies in a gentler, more thoughtful process. It requires shifting your mindset from that of a renovator to that of a custodian. The key is not in the power of your tools, but in your understanding of the wood itself as a living material. This involves respecting its finite thickness, knowing how to perform invisible repairs, and choosing a finish that will age as gracefully as the oak beneath it.
This guide will walk you through that philosophy. We will explore why a light screening is often profoundly better than a deep sanding. We will detail the craft of patching damage so it blends seamlessly with the surrounding patina. We will compare finishes not on their initial shine, but on how they mature over decades. By the end, you will have the knowledge to restore your floor’s beauty and resilience, ensuring its character is not a casualty of the process, but its crowning glory.
To guide you through this craft, this article is structured to build your expertise from core principles to specific techniques. The following sections cover every critical decision you will face.
Summary: A Craftsman’s Approach to Oak Parquet Restoration
- Why You Should Screen Instead of Sand to Preserve Wood Thickness?
- How to Patch a Deep Gouge in Oak Without Refinishing the Whole Room?
- Natural Oil or Polyurethane: Which Ages Better on Solid Oak?
- The Cleaning Mistake That Turns Your Oak Floor Grey and Black
- When to Install: Why Wood Needs 2 Weeks to Adjust to Your Home’s Humidity?
- When to Buy Local Wood: Understanding Seasonal Availability
- How to Verify the Safety of Reclaimed Wood for Interior Use?
- How to Reduce Footstep Noise for Your Downstairs Neighbors?
Why You Should Screen Instead of Sand to Preserve Wood Thickness?
The most crucial decision in restoring a heritage floor is how you treat its surface. Aggressive drum sanding is a one-way street; it permanently removes the wood’s lifeblood. A solid oak parquet floor only has a finite amount of wood above the tongue and groove, and each deep sanding brings it closer to its end of life. Preservation-focused restoration techniques show that sanding can remove 1/16th of an inch of actual wood, while a gentle screening (or “buffing”) only abrades the top layer of the old finish.
Screening uses a mesh screen on a floor buffer to lightly scuff the existing finish, creating a mechanical bond for a new coat. This method is ideal for floors with only surface-level wear—light scratches, scuffs, and dullness—but where the finish is otherwise intact. Its greatest advantage is the preservation of material integrity and patina. You are not erasing the wood’s history, but adding a new protective layer upon it. This maintains the subtle color variations and character that make an old floor so compelling.
However, screening is not a universal solution. It cannot fix deep gouges, heavy staining, or uneven boards. Furthermore, if the floor was ever waxed, screening will simply gum up the screen and spread the wax contamination. In those cases, more intensive methods may be necessary, but chemical stripping should be considered before aggressive sanding.
This table from wood flooring experts helps clarify when screening is the appropriate choice, viewing it as one tool in a restorer’s kit, not the only one.
| Condition | Screening | Chemical Stripping |
|---|---|---|
| Light surface wear | Excellent choice | Not necessary |
| Old wax buildup | Will clog screen | Best option |
| Patina preservation | Maintains 100% | Maintains 95% |
| Time required | 1-2 days | 2-3 days |
| Wood thickness loss | None | None |
Ultimately, choosing to screen is choosing to be a custodian of your floor. It is a patient act that prioritizes longevity over a quick-fix, ensuring the floor can be refreshed again decades from now. This approach respects the wood as a finite, precious resource.
How to Patch a Deep Gouge in Oak Without Refinishing the Whole Room?
A deep gouge or a badly damaged block in your parquet doesn’t have to mean refinishing the entire room. A hallmark of true craftsmanship is the ability to perform an invisible repair that honors the surrounding floor. The goal is not just to fill a hole, but to replicate the texture, color, and grain of the aged wood. This requires moving beyond generic, one-size-fits-all wood fillers from a big-box store.
For smaller imperfections, a high-quality, water-based wood filler can be tinted to match. Some restorers achieve remarkable results by thinning a product like Timbermate, spreading it across a section to fill minor gaps, and allowing the natural aging to blend the repair. However, for a truly invisible patch on a deep gouge, one must learn to mimic the wood grain itself. This involves carefully drawing in the grain lines with artist’s pens after the filler has been sanded flush, a technique that requires patience and a keen eye but yields spectacular results.
For more significant damage, the most respectful method is the “Dutchman patch.” This involves carefully cutting out the damaged area in a geometric shape (often a diamond or bow-tie) and inlaying a new piece of wood, ideally reclaimed oak of a similar age and species. The key is to orient the grain of the patch to perfectly match the grain of the surrounding floorboards. It is a surgical procedure that, when done well, becomes a beautiful and honest part of the floor’s history.
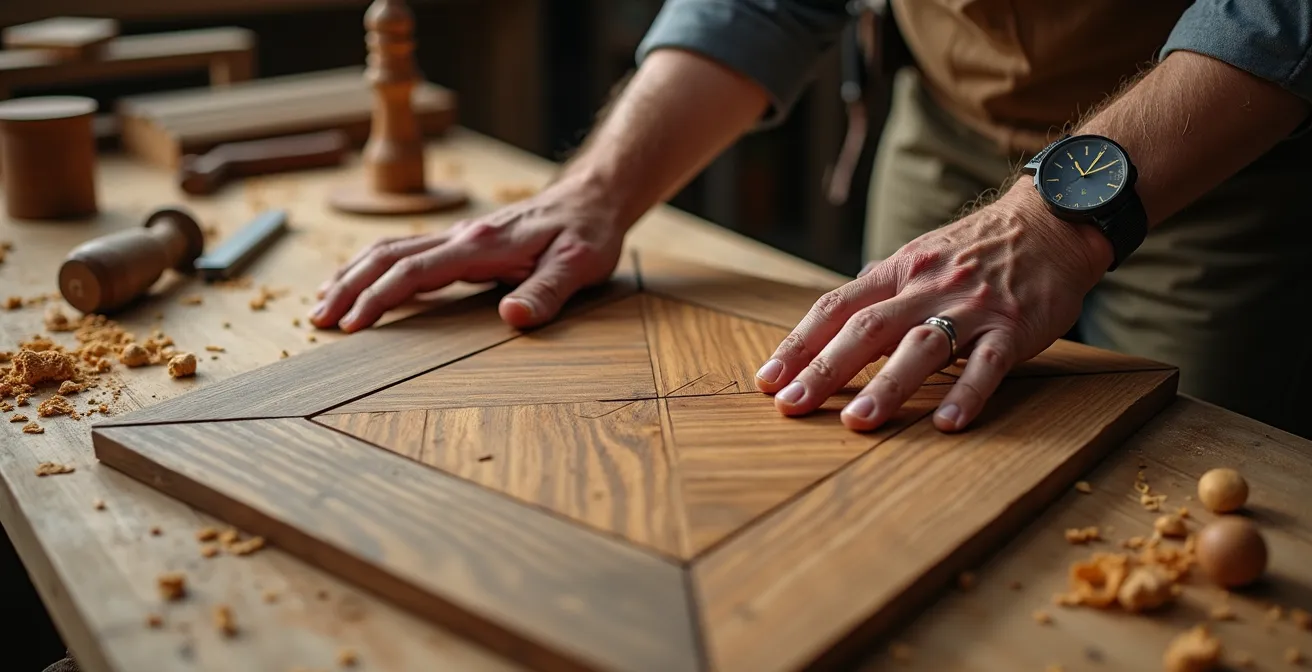
As the image above illustrates, the Dutchman patch technique is a testament to skill and respect for the material. The focus is on a precise fit and perfect grain matching, turning a flaw into a feature. Whether using filler or a wood patch, the final step is feathering the edges of the repair and applying a subtle wash of stain or finish to blend the color seamlessly. This is the essence of a reversible and respectful repair.
Natural Oil or Polyurethane: Which Ages Better on Solid Oak?
The finish you choose is not just a protective layer; it defines how your floor will look, feel, and age for decades to come. The debate between traditional natural oils and modern polyurethane is not about which is “better,” but which philosophy aligns with the goal of preserving a heritage floor’s character. Polyurethane creates a durable, plastic-like film that sits *on top* of the wood. Natural oil or hardwax-oil finishes, by contrast, penetrate the wood fibers and become *part of* the wood itself.
This fundamental difference dictates how they age. A polyurethane finish wears like a separate layer. When it scratches or scuffs, the damage is in the plastic film. Repairing it requires sanding down the entire section, or even the whole room, to apply a new, even coat. It is an all-or-nothing proposition. Over time, oil-based polyurethanes can also take on a distinct yellow or amber hue, which can obscure the natural color of the oak.
A natural oil finish ages *with* the wood. It provides a deep, matte lustre that enhances the grain’s texture, rather than reflecting light off a plastic surface. The floor feels like real wood underfoot. Most importantly, it is maintainable and spot-repairable. A scratch or a dull spot in a high-traffic area can be fixed by lightly cleaning the area and reapplying a small amount of oil. This “feeds” the wood and seamlessly blends the repair. With regular, simple maintenance, an oiled floor never needs to be fully sanded and refinished again. It simply evolves, its patina deepening with time.
This table breaks down the long-term characteristics, highlighting how each finish type approaches the concept of aging and maintenance.
| Characteristic | Natural Oil Finish | Polyurethane Finish |
|---|---|---|
| Aging Process | Becomes part of wood, ages together | Sits on surface, ages separately |
| Maintenance | Spot repairs possible without refinishing | Full refinishing needed for repairs |
| Light Reflection | Deep matte lustre enhances grain | Surface reflection can obscure detail |
| UV Reaction | Minimal color change | Yellowing over time with oil-based |
| Longevity | Indefinite with regular maintenance | 10-15 years before full refinishing |
For a homeowner acting as a custodian, the choice of a natural oil finish is often a commitment to the long-term health and authentic character of their floor, embracing a cycle of care rather than periodic, aggressive overhauls.
The Cleaning Mistake That Turns Your Oak Floor Grey and Black
Even the most beautifully refinished floor can be ruined by improper cleaning. One of the most common and heartbreaking mistakes owners of oak floors make is seeing their wood develop unsightly grey or black stains, often after what they believed was a thorough cleaning. This discoloration is not dirt; it is a chemical reaction, and it is almost always caused by an excess of water interacting with the wood’s natural properties.
Oak, especially red oak, is rich in tannins. When these tannins come into contact with water and iron, a chemical reaction occurs, creating ferric tannate—a dark, blue-black pigment that stains the wood from within. The source of the iron can be microscopic; it could be residue from steel wool used in a previous refinishing, tiny metal fragments in tap water, or even the nails holding the floor down. As flooring experts have documented, even water-based finishes on exposed iron can cause rust formation and blue-black staining in red oak. The key catalyst is always an over-abundance of water, which penetrates the finish and reaches the bare wood.
This is why tools like steam mops are catastrophic for hardwood floors. They force hot moisture deep into the seams and grain, guaranteeing this reaction will occur. The same goes for using a soaking wet mop or leaving spills to sit. The only way to prevent this is through a strict, low-moisture cleaning protocol. A proper cleaning involves a pH-neutral wood soap, heavily diluted in distilled water (which is free of mineral contaminants), applied with a well-wrung-out microfiber mop. Each section should be immediately towel-dried before moving to the next. The wood should never be saturated.
For routine cleaning, a simple dust mopping or vacuuming (with a soft brush head) is all that is needed. This diligent, water-conscious approach is the single most important habit for preserving the color and integrity of your oak floor for a lifetime.
When to Install: Why Wood Needs 2 Weeks to Adjust to Your Home’s Humidity?
When performing a patch or replacing a section of your parquet, the new wood must be given time to acclimate to your home’s environment. This is one of the most frequently skipped steps, and its omission is the primary cause of gapping, cupping, and buckling down the line. Wood is a hygroscopic material, meaning it acts like a sponge, absorbing and releasing moisture to stay in balance with the ambient humidity. This process causes it to expand and contract.
Every home has a unique “equilibrium moisture content” (EMC), which is the point at which wood will no longer gain or lose moisture. This is determined by the home’s average temperature and relative humidity. New wood arriving from a lumberyard will have a different moisture content than your house. Installing it immediately is a recipe for disaster. If the new wood is wetter, it will shrink as it dries, creating unsightly gaps. If it’s drier, it will expand as it absorbs ambient moisture, potentially buckling and pushing against adjacent boards.
The solution is patience. A proper acclimation period, typically lasting one to two weeks, allows the new wood to reach its EMC within your home’s specific conditions *before* it is nailed down. This isn’t a passive process. The wood shouldn’t just be left in a stack. For proper acclimation, the blocks should be unboxed and “stickered”—stacked with small, 1/4-inch spacers between each layer. This allows air to circulate freely around all six sides of every piece, ensuring it adjusts evenly.
A professional uses a moisture meter to scientifically verify the process. They will measure the moisture content of the new wood and compare it to that of the existing subfloor or an established piece of wood in the room. The new wood should not be installed until its moisture content is within 2% of the existing wood. This disciplined, scientific approach treats the wood as the living, breathing material it is, ensuring the repair remains stable and seamless for its entire life.
When to Buy Local Wood: Understanding Seasonal Availability
When your restoration project requires patching, the ideal material is not new wood from a lumberyard, but reclaimed wood of a similar age and species to your existing floor. Sourcing this material is an art in itself. Local reclaimed wood suppliers, salvage yards, and even architectural antique stores can be treasure troves for finding period-appropriate oak that will provide a much better match in terms of color, grain density, and patina.
New wood, even of the same species, has been grown and milled under different conditions. Old-growth oak from the 1920s often has tighter grain patterns than modern, faster-grown timber. Using reclaimed wood for a patch ensures the repair shares a similar history with the rest of the floor, allowing it to blend in far more naturally. It’s the ultimate act of respect for the floor’s material integrity.
However, “reclaimed” does not automatically mean “ready to use.” When you find a potential source for your patch material, you must become an investigator. Ask the supplier detailed questions. Where did the wood come from? How was it stored? Has its moisture content been measured? This is not just about aesthetics; it’s about ensuring the wood is stable and safe for your home. Even if you cannot find a perfect wood match, modern finishing techniques can help bridge the gap. For instance, specialized sealers like Bona NordicSeal can be used to neutralize the pinkish tones of red oak to help it blend with a floor that has a more neutral, white-oak appearance.
Engaging with local suppliers also connects your project to your region’s history. The availability of certain types of reclaimed wood can be seasonal or dependent on local demolition projects. Building relationships with these suppliers can give you access to unique materials that make your restoration truly special. Your role as a custodian extends to the materials you choose, prioritizing authenticity and history at every step.
Key Takeaways
- Preservation First: Always choose the least aggressive method, like screening over sanding, to preserve the wood’s thickness and character.
- Invisible Repairs: Use advanced techniques like grain mimicry or a Dutchman patch with reclaimed wood for seamless, respectful repairs.
- Finish for the Future: Select a natural oil finish for its ability to age gracefully and allow for easy spot repairs, unlike polyurethane.
How to Verify the Safety of Reclaimed Wood for Interior Use?
Sourcing beautiful, period-appropriate reclaimed oak for your repair is a significant win. However, before that wood enters your home, you have a duty of care to ensure it is safe. Reclaimed wood can carry hidden risks from its previous life, including chemical treatments, pests, or mold. Verifying its safety is a non-negotiable step in responsible restoration.
The first line of defense is a thorough visual and sensory inspection. Look for oily residues or unusual discoloration, and be wary of any chemical odors. These could be signs of past treatments with preservatives like creosote or pentachlorophenol (PCP), which are not safe for interior use. If the wood was painted, it’s essential to test for lead. Simple, EPA-approved lead test swabs are readily available and can give you an immediate answer.
Another major concern is the presence of wood-boring insects. Look for small “exit holes” on the surface of the wood. If you see evidence of pests, the wood is not necessarily unusable. Professional restoration data confirms that kiln-drying at 140°F (60°C) for 24 hours eliminates 100% of wood-boring insects and their larvae. Many reputable reclaimed wood suppliers will perform this kiln-drying as a standard procedure. Finally, use a moisture meter to check that the wood’s moisture content is below 12%. Anything higher risks bringing mold spores into your home.
Action Plan: Safety Testing Protocol for Reclaimed Wood
- Visual inspection: Check for oily residues, chemical odors, or unusual discoloration that could indicate harmful past treatments.
- Lead test: Use an EPA-approved lead test swab on any painted or finished surfaces, as is common with older materials.
- Insect inspection: Look for tiny exit holes (1/32 to 1/8 inch) which are tell-tale signs of past or present beetle or termite damage.
- Moisture test: Verify with a moisture meter that the wood’s moisture content is safely below 12% to prevent the introduction of mold.
- Professional assessment: For any wood of suspect origin, consider sending a sample to a lab for testing for arsenic, creosote, or formaldehyde.
This systematic check is a vital part of your role as a responsible custodian. It ensures that your beautiful, historic repair doesn’t compromise the health and safety of your home environment.
How to Reduce Footstep Noise for Your Downstairs Neighbors?
Living with a heritage parquet floor, especially in an apartment or multi-story home, means being conscious of more than just its visual character. It also means considering its acoustic character. Hard surfaces transmit impact noise—like footsteps—very effectively, and being a good custodian of your home often extends to being a good neighbor. Fortunately, there are several non-invasive ways to significantly reduce sound transmission without compromising the beauty of your floor.
The simplest and most effective solutions are additive. High-quality, thick rugs or runners made from wool, with a dense rubber or felt backing, are excellent at absorbing sound in high-traffic areas like hallways and living spaces. Similarly, applying high-density felt pads to the legs of all your furniture—chairs, tables, sofas—is a small change that makes a huge difference, muffling the noise of items being shifted around. These pads should be checked and replaced every six months as they can compress over time.
Your choice of finish can also play a subtle role. A penetrating oil finish, which leaves the wood’s surface texture more natural, tends to have a slightly softer sound profile than a hard, glassy polyurethane finish that can amplify sharp sounds. Furthermore, look for sources of sound leakage. Gaps between the floorboards and the baseboards or walls can be sealed with a flexible, high-quality acoustic sealant. This prevents sound from flanking around the main floor structure. Combining these small, thoughtful measures can dramatically improve the acoustic comfort for those living below you.
These solutions embody the principle of respectful living. They require no structural changes and preserve the integrity of your floor while enhancing the quality of life for everyone in the building. It’s a final layer of craftsmanship that considers the home as a shared environment.
By adopting this preservation-focused mindset, you are not just refinishing a floor; you are curating a piece of your home’s history. To begin your own project with this philosophy, the next logical step is to carefully assess your floor’s condition and choose the path—screening or more intensive restoration—that best honors its unique character.