
Contrary to popular belief, sitting perfectly straight is a direct path to spinal distress. The key to eliminating lower back pain is not forcing a rigid, static posture but creating a system of “postural fluidity.” This involves making specific, science-backed adjustments to your existing chair, screen, and keyboard to encourage constant micro-movements, which keeps your muscles active, reduces joint compression, and supports your entire kinetic chain from your neck down to your hips.
If you’re a remote worker, you’re likely familiar with the creeping ache in your lower back that intensifies as the day wears on. You’ve probably tried all the standard advice: sit up straight, get an expensive ergonomic chair, or stuff a pillow behind your back. Yet, the stiffness, sciatic nerve pain, and chronic discomfort persist. This is because the conventional wisdom about “good posture” is fundamentally flawed for the reality of an eight-hour workday. It treats the body like a static structure to be locked into a single “correct” position.
The truth from a physiotherapy perspective is that the human body is designed for movement. Pain arises not from the wrong position, but from the *lack of position changes*. Forcing your spine into a rigid 90-degree angle for prolonged periods is unnatural and places immense strain on your lumbar discs and surrounding musculature. Research from Frontiers in Sports and Active Living confirms that prolonged static sitting can lead to a significant 17.6% increase in lumbar spine muscle stiffness, effectively locking your back into a state of tension.
But what if the solution wasn’t a new chair, but a new philosophy? The key is to transform your static workstation into a dynamic ecosystem. This guide will provide you with a physiotherapist-led framework to re-engineer your current setup. We will dismantle harmful posture myths and give you a systematic approach to adjusting your existing equipment—your chair, screen, and keyboard—to promote health, eliminate pain, and prevent burnout before it begins.
For those who prefer a hands-on demonstration, the following video explains the core mechanics of adjusting a multi-tilter chair, which shares fundamental principles applicable to many standard office chairs.
This article provides a structured approach to transforming your workspace. We will systematically address each component of your ergonomic setup, from the fundamental principles of sitting to the micro-habits that sustain long-term spinal health.
Summary: A Systematic Approach to a Pain-Free Workday
- Why “Sitting Up Straight” Is Actually Bad for Your Spine Over 8 Hours?
- How to Position Your Screen to Prevent Neck Strain and Headaches?
- Standing Desk or Balance Ball: Which Burns More Calories While Working?
- The Keyboard Angle Mistake That Leads to Carpal Tunnel Syndrome
- When to Stand Up: The 20-8-2 Rule for Metabolic Health
- Lever Handles or Round Knobs: Which Is Better for Arthritic Hands?
- How to Create a “Tech-Free Zone” in a Studio Apartment?
- How to Prevent Burnout Before It Starts Using Micro-Habits?
Why “Sitting Up Straight” Is Actually Bad for Your Spine Over 8 Hours?
The most pervasive myth in office ergonomics is the “90-90-90” rule, which commands you to sit bolt upright with your back, hips, and knees at perfect right angles. While this may feel correct for a few minutes, maintaining this rigid, high-tension posture for hours is a recipe for disaster. It forces your spinal erector muscles into a constant, isometric contraction, leading to fatigue, reduced blood flow, and the very stiffness you’re trying to avoid. This static load compresses the lumbar discs and inhibits the natural S-curve of your spine.
The healthier alternative is a concept I call “postural fluidity.” This means embracing a slightly reclined and relaxed posture, typically between 100-110 degrees, where your back is fully supported by the chair’s backrest. This position offloads your spinal muscles, allowing them to relax while the chair does the work. More importantly, postural fluidity involves frequently changing your position. No single posture is perfect for eight hours.
The goal is to move. Lean back, shift your weight, gyrate your hips, and cross and uncross your legs (yes, it’s okay!). These micro-movements act like lubrication for your joints and muscles, promoting circulation and preventing the buildup of static load. Think of your chair not as a fixed brace but as a home base from which you can launch a variety of different, temporary postures throughout the day.
By abandoning the rigid “sit straight” rule in favor of supported, dynamic sitting, you allow your body to function as it was designed—in motion. This is the first and most crucial step toward alleviating chronic lower back pain.
How to Position Your Screen to Prevent Neck Strain and Headaches?
Your body follows your eyes. If your screen is too low, your head will tilt down, forcing your neck forward and rounding your upper back. This “forward head posture” breaks your body’s kinetic chain, placing immense strain on the cervical spine and contributing directly to tension headaches, shoulder pain, and ultimately, a compensatory curve in your lower back. Correcting screen height is not an isolated fix; it is fundamental to aligning your entire spine.
To find your optimal screen height, follow this simple procedure: sit back comfortably in your chair in your ideal reclined posture. Close your eyes and let your head find a natural, neutral position. When you slowly open your eyes, your gaze should land directly in the center of your screen. For most people, this means the top of the monitor should be at or slightly below eye level.
For laptop users, this presents a significant ergonomic challenge, as the screen and keyboard are fused. The non-negotiable solution is to separate them. Use a stack of books, a monitor stand, or a dedicated laptop riser to elevate your screen to the correct height. You must then use an external keyboard and mouse to keep your arms and wrists in a healthy, neutral position.
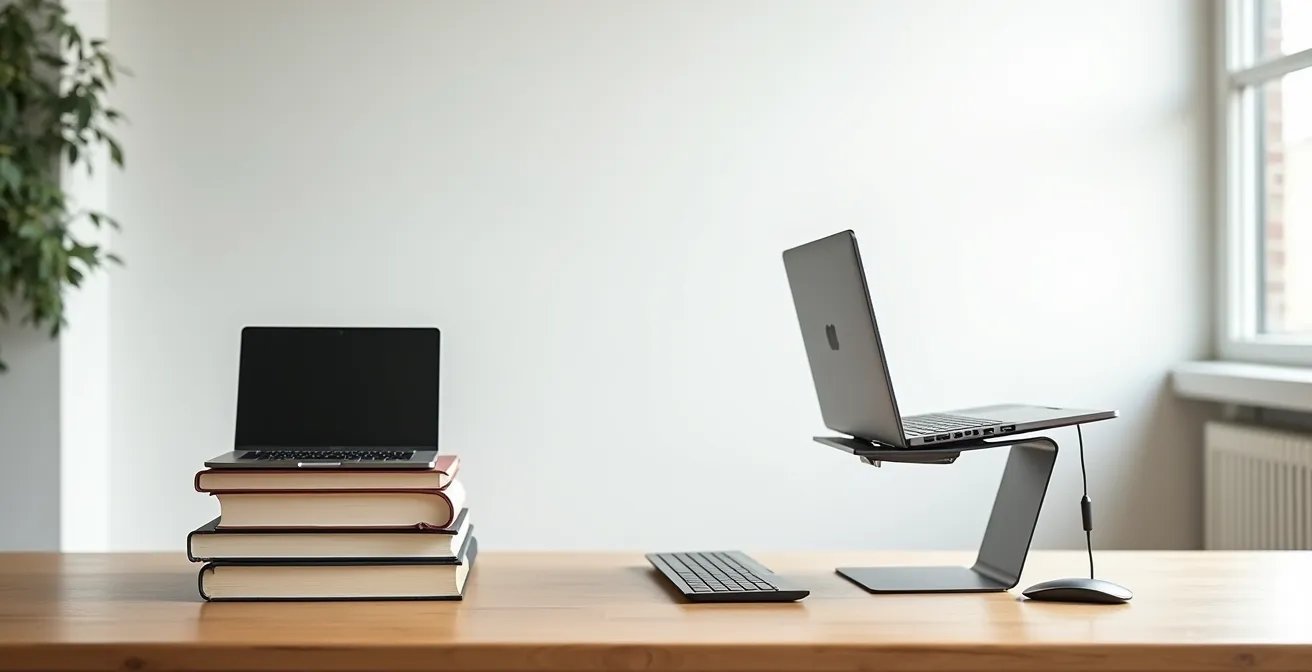
As the setup above demonstrates, this simple adjustment transforms a laptop from an ergonomic hazard into a viable workstation. If you use dual monitors, the placement depends on your workflow. For 50/50 usage, center the seam between the two monitors with your body’s midline. For an 80/20 split, place your primary monitor directly in front of you and the secondary monitor at a 30-degree angle to the side.
By treating your screen as the command center for your posture, you prevent the cascade of strain that begins in the neck and inevitably travels down to sabotage your lower back.
Standing Desk or Balance Ball: Which Burns More Calories While Working?
In the quest for a more active workday, many people turn to standing desks or balance balls, often with the primary goal of burning more calories. From a clinical perspective, this focus is slightly misplaced. While both options are preferable to static sitting, the caloric difference is minimal. A standing desk burns only marginally more calories than sitting, and a balance ball’s benefit is not in calorie expenditure but in muscular activation. The real value of these tools lies in their ability to promote micro-movements and postural variation.
A standing desk is excellent for breaking up prolonged sitting, changing the load on your spine, and engaging your leg muscles. However, standing statically for hours can lead to its own set of problems, including foot pain and venous pooling. The key is to alternate between sitting and standing, not to replace one static posture with another.
A balance ball, on the other hand, creates an unstable surface that forces your core muscles to engage constantly to maintain stability. While not a replacement for a supportive chair for the entire day, using it for short periods can be a great way to build core strength and endurance. The constant, subtle adjustments required are a perfect example of active sitting. However, for those with acute back pain, the lack of back support can be detrimental if used for too long.
Ultimately, the “best” option is not a single product but a strategy of variety. The most effective approach is to have a supportive primary chair and incorporate periods of both standing and active sitting on a balance ball or stool throughout the day. The goal isn’t to burn calories; it’s to keep your body guessing and prevent any one muscle group or joint from bearing a static load for too long.
Instead of investing in a single, expensive solution, focus on building a routine that includes sitting, standing, and moving in regular intervals.
The Keyboard Angle Mistake That Leads to Carpal Tunnel Syndrome
Pain in the kinetic chain can start at the extremities. A seemingly minor detail—the angle of your keyboard—can create a domino effect of strain that travels from your wrists up to your shoulders and neck, ultimately affecting your spinal posture. Many keyboards come with small feet that flip out to tilt the keyboard upwards. This “positive tilt” is one of the most common ergonomic mistakes, as it forces your wrists into a state of dorsiflexion (extension), compressing the delicate structures within the carpal tunnel.
The cardinal rule for wrist health is to maintain a neutral position, where your hands and forearms form a straight line. To achieve this, you should immediately collapse the keyboard’s feet to make it lie flat on the desk. This simple action is often enough to relieve significant strain.
The following table illustrates the direct impact of keyboard positioning on carpal tunnel risk. A flat or even negatively-tilted keyboard is the clinical recommendation for long-term wrist health.
| Keyboard Position | Wrist Angle | Carpal Tunnel Risk | Recommended Action |
|---|---|---|---|
| Feet Extended (Positive Tilt) | Extended/Dorsiflexed | High | Collapse feet immediately |
| Flat Position | Neutral | Low | Maintain position |
| Negative Tilt | Slightly Flexed | Low-Moderate | Use with ergonomic support |
| Standard Straight Layout | Ulnar Deviation | Moderate | Center ‘B’ key with midline |
Furthermore, proper technique involves “floating” your hands over the keyboard while typing, rather than resting your wrists on the desk or a hard wrist rest. This engages the larger muscles of your arm and back, rather than straining the small tendons in your wrist. Another crucial detail is centering your body with the keyboard. Your midline should align with the ‘B’ key, not the center of the entire keyboard, to prevent unnatural twisting.

By ensuring your wrists remain neutral, you interrupt a major source of tension that would otherwise compromise your neck and back posture.
When to Stand Up: The 20-8-2 Rule for Metabolic Health
Even with a perfectly adjusted chair, the greatest ergonomic risk is remaining sedentary for too long. Prolonged sitting slows your metabolism, impairs circulation, and places a relentless static load on your spine. The key to mitigating this risk is to interrupt sitting with frequent, structured breaks. While the generic advice is to “take breaks,” a more prescriptive and memorable framework is necessary for building a sustainable habit. For this, we turn to the science of ergonomics.
Leading ergonomics experts at Cornell University recommend a dynamic cycle known as the “20-8-2 Rule.” This evidence-based formula provides a clear and actionable rhythm for your workday: for every 30-minute block, you should aim for 20 minutes of sitting, 8 minutes of standing, and 2 minutes of moving or stretching. This cycle ensures you are never in one position for too long, keeping your metabolism active and your muscles engaged.
The “2 minutes of moving” is the most critical part of this rule. This is your opportunity to actively reverse the postural stresses of sitting. You don’t need a gym; you just need to move your body through different planes of motion. Simple stretches targeting the muscle groups that become tight from sitting—like the hip flexors, hamstrings, and thoracic spine—can provide immediate relief and long-term benefits.
Action Plan: Your 2-Minute Movement Menu
- Hip flexor stretch: Step back into a lunge position, keeping your back straight. Hold for 30 seconds on each side to open up the front of your hips.
- Standing backbend: Place your hands on your lower back for support and gently arch backward, pushing your hips forward to create a gentle spinal extension.
- Thoracic rotation: Cross your arms over your chest and rotate your upper trunk from left to right, keeping your hips stable. Perform 10 repetitions to mobilize your mid-back.
- Wall slides: Stand with your back against a wall. Place your arms in a “goal post” position against the wall and slide them up and down to activate your shoulder and back muscles.
- Hamstring stretch: Place your heel on your chair or a low stool with your leg straight. Gently lean forward from your hips until you feel a stretch in the back of your thigh. Hold for 30 seconds.
Set a recurring 30-minute timer as a non-negotiable part of your workday. This simple habit is one of the most powerful tools for protecting your metabolic and spinal health.
Lever Handles or Round Knobs: Which Is Better for Arthritic Hands?
The principles of ergonomics extend beyond posture to the very act of interacting with our environment. For individuals with arthritis, hand weakness, or repetitive strain injuries, the design of a simple handle or knob can be the difference between comfort and pain. The guiding clinical principle here is the use of levers over fine-motor pinch grips. A lever allows you to use the larger, stronger muscles of your whole hand and arm, while a small, round knob forces you to use a precise, stressful pinch grip that concentrates force on small, vulnerable joints.
This principle is directly applicable to your office chair. Many chairs feature small, hard-to-turn knobs for adjusting tension or height. A chair with large, paddle-style levers is vastly superior from an ergonomic standpoint. It allows for quick, low-stress adjustments without requiring a forceful grip. When choosing any equipment, from chairs to monitor stands, always favor designs that utilize leverage.
Case Study: The Lever Principle in Practice
Office ergonomics specialist Barry Einhorn, with over 40 years of experience, consistently demonstrates how applying the lever principle significantly reduces hand strain. By comparing the fine-motor pinch grip required for a standard mouse to the whole-hand neutral grip of a vertical mouse, he shows a clear reduction in joint stress. Similarly, contrasting monitor stands that use tiny adjustment screws with modern gas-spring arms that can be moved with a light touch highlights how lever-based designs accommodate a wider range of grip strengths and reduce the risk of strain for all users, especially those with pre-existing hand conditions.
You can also apply this principle through simple, low-cost “hacks” in your home office. By adapting your existing tools to increase their grip diameter or add leverage, you can drastically reduce hand strain. Consider these simple modifications:
- Wrap thick rubber bands or foam tubing around thin pens and tool handles to create a wider, easier grip surface.
- Replace standard computer mice with vertical ergonomic models that promote a neutral “handshake” grip.
- Choose water bottles and containers with flip-top lids or large handles instead of small, tight screw caps.
- If possible, install lever-style door handles in your home office to eliminate the need to twist doorknobs.
By reducing strain on your hands, you prevent a source of tension that can radiate up the arms and contribute to shoulder and neck issues, completing the kinetic chain of pain.
How to Create a ‘Tech-Free Zone’ in a Studio Apartment?
For remote workers, especially those in smaller living spaces like studio apartments, the line between “work” and “life” can blur into non-existence. When your desk is also your dinner table, your brain struggles to disengage from work mode. This lack of physical and mental separation is a significant contributor to stress, poor sleep, and ultimately, burnout. Creating a “tech-free zone” in a small space is less about physical walls and more about creating powerful temporal and sensory boundaries through a structured shutdown ritual.
The goal is to create a clear “end of workday” transition that signals to your brain that it is time to switch off. This ritualistic approach, sometimes called a “digital sunset,” transforms your workspace both physically and sensorily. It’s about making your work environment literally disappear at a set time each day.
A successful shutdown ritual involves a sequence of deliberate actions. It starts with setting a hard stop time and adhering to it. When the time comes, it’s not enough to simply close your laptop; you must physically store it away in a drawer or bag, out of sight. Clearing your desk of all work-related materials is the next step. This physical transformation is then reinforced with sensory cues: change the lighting from a bright, cool work light to a warm, dim relaxation light. Switch the music from a focus playlist to something calming. You might even use a specific scent, like diffusing lavender, to anchor the transition. One highly effective practice is to perform a “mock commute”—a short, five-minute walk around the block before starting and after finishing work to create a clear psychological boundary.
This “temporal zoning” is a form of mental ergonomics that is just as critical as your physical setup for preventing the chronic stress that exacerbates physical pain and leads to burnout.
Key takeaways
- Ditch the “sit up straight” myth; opt for a slightly reclined, supported posture (100-110 degrees) that encourages frequent position changes.
- Align your kinetic chain by setting your screen height so the top is at or below eye level, and always use an external keyboard with laptops.
- Adopt the 20-8-2 Rule: 20 minutes sitting, 8 minutes standing, and 2 minutes of active movement every half hour to protect your metabolic and spinal health.
How to Prevent Burnout Before It Starts Using Micro-Habits?
Burnout is not a sudden event; it’s the culmination of chronic, unmanaged stress—both physical and mental. Poor ergonomics contribute to a constant, low-grade physical stress that drains your energy, while a lack of boundaries creates relentless mental strain. The data is stark: some research shows adults face a 34% increased all-cause mortality risk from sitting 10 hours a day. Preventing burnout requires a proactive strategy built on “mental ergonomics” and integrated micro-habits that address these stressors before they become overwhelming.
Just as physical ergonomics optimizes the interaction between your body and its environment, mental ergonomics optimizes your cognitive and emotional resources. It involves building small, intentional habits that create space, reduce cognitive load, and regulate your nervous system throughout the day. These aren’t grand gestures; they are tiny, sustainable actions that you can “habit stack” onto your existing routines.
For example, you can implement a “mental palate cleanser” by gazing out a window for 60 seconds between back-to-back meetings. This provides a visual and cognitive break that resets your focus. The “mock commute” walk we discussed earlier serves as a powerful boundary ritual for both the start and end of your day. Integrating a simple 4-7-8 breathing pattern (inhale for 4, hold for 7, exhale for 8) for just one minute every hour can effectively down-regulate your stress response. By linking these micro-habits to existing triggers—like linking a two-minute body scan to your 20-8-2 movement break—you build a resilient system that works automatically.
By weaving these physical and mental micro-habits into the fabric of your workday, you move from a reactive state of damage control to a proactive state of well-being, effectively preventing the cycle of pain and exhaustion before it can even begin.